HackTown
Cyber Criminal University - Home

You are not logged in. You will only be able to access the courses in GREEN from the course list.
Chapter 5 - Search for Targets

Remember, in the MiTM section if you encounter any issues you should boot Kali from USB or install Kali as your main OS.
If you're able to access the router admin interface then you can determine who's on the network. However, there are times when we can't get into the router admin interface so we'll need to scan the network to determine how many people are connected to it and what type of devices are on it.
There are a few techniques of finding targets on the network and each technique tends to display different results depending on what tool is being used and what network protocols are being used by that specific tool (ICMP, ARP, etc.). It also matters what type of machines you're scanning so I suggest using all the techniques discussed to see the differences of each.
The first tool we'll use is fping
fping is a tool we'll use to send Internet Control Message Protocol (ICMP) echo probes to network clients (other people on the network) and check for the ICMP responses. For anyone who's like WTF is ICMP?! This is just the ICMP protocol request/response commonly referred to as "ping". For anyone who's like WHOA WTF was just said please take a minute and Google that shit or stop what you're doing because if you don't understand ping, ICMP, and the absolute basics then maybe you're too noob level hacker fuck pants to fully enjoy this course. Level up man come on! It's literally one book about basic networking that you have to read. You've probably spent more fucking time reading FaceBook while on the shitter then it would take you to understand basic things. Educate yourself, learn specific points of interest, follow wicked guides like this, and shut the fuck up man get to acceptable cybercriminal hacker level.
Anyways, any network client that responds to an ICMP probe request the fping tool will consider that host active/alive which is a potential target for you. However, some machines are configured not to respond to ICMP probes (firewall, host settings, etc.) which is why we want to run a couple different tools to ensure we're capturing everyone and not missing any mother fuckers on the network.
Obviously you will be using your IP subnet and not typing my IP examples out like a fucking stooge. You need to be using YOUR IP and replace my IP examples...
In Kali open a new terminal window:
fping -sagq YOUR-IP-ENDING-IN-A-0/24
Here's my example of using fping
Using my IP (192.168.0.7) as the example we want to scan the whole subnet.
fping -sagq 192.168.0.0/24
Note the 192.168.0.0 instead of my IP of 192.168.0.7. This is the YOUR-IP-ENDING-IN-A-0 explanation. Hopefully you follow.
I usually pipe the output into a file so I can review it at my leisure but do whatever works for you.
Piping the output into a file for review later would be:
fping -sagq 192.168.0.0/24 > FILE
cat FILE
Now after running fping you can see the targets on the network that you can potentially attack but like I said some hosts do not reply to ping (ICMP requests) and you want to ensure you're not missing any potential targets.
In ACT I we briefly talked about the Address Resolution Protocol (ARP) in relation to MAC addresses. Picture the ARP as being able to map IP addresses to your Ethernet hardware addresses (MAC address). Matching your IP to your Wi-Fi network card MAC. Understand I hopes? The router keeps track of all the connected devices in a Content Addressable Memory (CAM) which essentially is just a table of records for everyone's MAC addresses. ARP is a simple request and response type protocol just like how ICMP is. It asks and waits for an answer. We can use this protocol in our favor to scan for devices on the network and is a very quick way to show every active IP device on the subnet. Since ARP cannot be re-routed this only works on the local network/subnet and obviously cannot be done across the Internet like ICMP can. If there are devices on the network that are not responding to ICMP, HTTPS, HTTP, etc. requests then those devices might have a firewall active and are intentionally blocking those requests by design. Therefore, those hosts would not show themselves as an active host. However, devices cannot hide from ARP packets like they can hide from ping requests so let's look at another tool to help determine how many people are on the network.
Every device should respond to an ARP request but as stated before you would want to run fping alongside this next tool to ensure you're covering all avenues.
The second tool we'll be using is called arp-scan
Keep in mind when using arp-scan that the responses that are displayed to you aren't always in order because some hosts may respond faster than others. Let's check it out.
In Kali open a new terminal window:
sudo arp-scan -l
l = scanning the local subnet. Another way would be "sudo arp-scan 192.168.128.0/24".
Check out the results and try and see if you can match every host found by this tool to a device on your network. How many do you see? Are there any hosts displayed to you that we would consider active targets and live hosts on the network we're on?
Let me show you an excellent example of the differences while on a "business network" I've hacked onto. Just read the following and don't type the syntax in. Just learn from my examples.
My Kali attacker machine IP is:
192.168.129.240.
For this example the computer/laptop target IP is:
192.168.128.158
Notice the difference of the IPs?
The target laptop/computer we're after has an IP of 192.168.128.158 and my Kali machine has an IP of 192.168.129.240.
Ideally you should have another computer and know the IP of it on the same network. That will be YOUR target machine.
In Kali I opened up a new terminal window:
fping -sagq 192.168.128.0/24
Results:
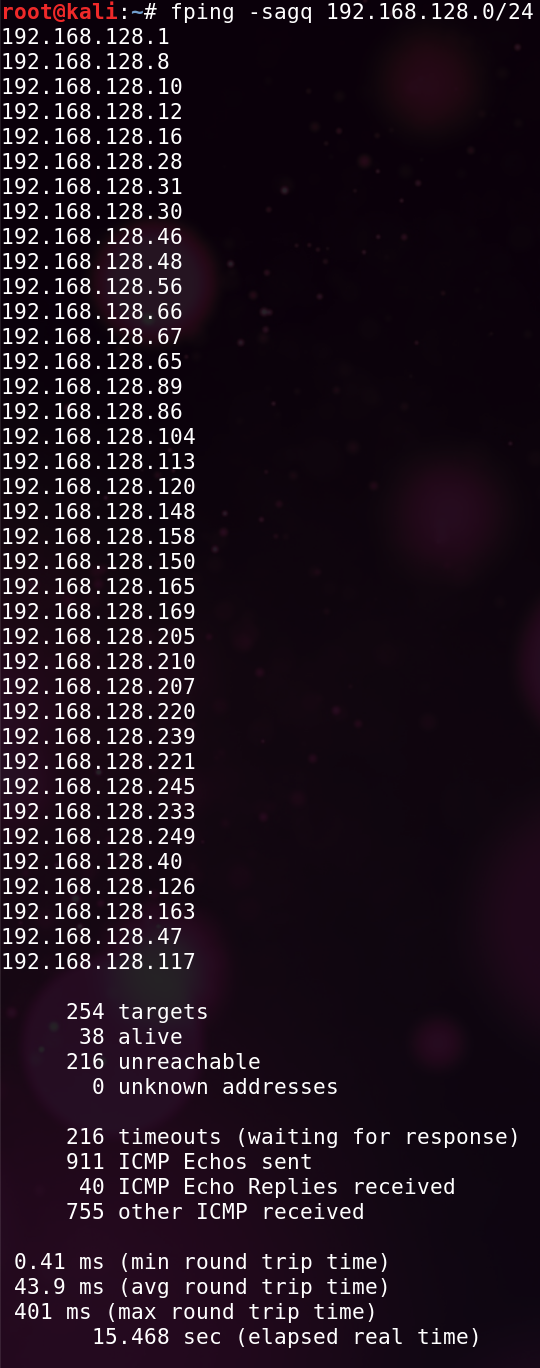
As you can see from the above screenshot we have (38) alive hosts on the network and we also can see the target IP (192.168.128.158) displayed as well. Remember, some of the hosts displayed will be out of order depending on when they received the ICMP packet and replied. Some hosts respond quicker than others :)
Using arp-scan you can see the difference in the number of available targets and IPs. Please note in my example results below I've removed the MAC addresses table to avoid being fingerprinted by you stalker fucks. LOL.
When I used arp-scan and fping while on the same network at the same time and compared the output results they were different.
In Kali I opened a new terminal window and typed:
sudo arp-scan -l
Results:
| IP | Computer name |
|---|---|
| 192.168.128.1 | Meraki, Inc. |
| 192.168.128.4 | (Unknown) |
| 192.168.128.8 | Meraki, Inc. |
| 192.168.128.10 | Meraki, Inc. |
| 192.168.128.12 | Meraki, Inc. |
| 192.168.128.16 | Apple, Inc. |
| 192.168.128.23 | (Uknown) |
| 192.168.128.26 | (Unknown) |
| 192.168.128.28 | (Unknown) |
| 192.168.128.30 | (Unknown) |
| 192.168.128.31 | Apple, Inc. |
| 192.168.128.56 | Apple, Inc. |
| 192.168.128.66 | (Unknown) |
| 192.168.128.40 | (Unknown) |
| 192.168.128.45 | (Unknown) |
| 192.168.128.46 | (Unknown) |
| 192.168.128.47 | (Unknown) |
| 192.168.128.48 | (Unknown) |
| 192.168.128.65 | (Unknown) |
| 192.168.128.68 | Apple, Inc. |
| 192.168.128.67 | Apple, Inc. |
| 192.168.128.94 | (Unknown) |
| 192.168.128.75 | D-Link International |
| 192.168.128.77 | Apple, Inc. |
| 192.168.128.86 | Apple, Inc. |
| 192.168.128.89 | (Unknown) |
| 192.168.128.117 | Apple, Inc. |
| 192.168.128.121 | Apple, Inc. |
| 192.168.128.125 | (Unknown) |
| 192.168.128.131 | (Unknown) |
| 192.168.128.104 | (Unknown) |
| 192.168.128.113 | (Unknown) |
| 192.168.128.126 | Samsung Electronics Co.,Ltd |
| 192.168.128.158 | Parallels, Inc. |
| 192.168.128.165 | (Unknown) |
| 192.168.128.148 | (Unknown) |
| 192.168.128.150 | Apple, Inc. |
| 192.168.128.163 | (Unknown) |
| 192.168.128.169 | Apple, Inc. |
| 192.168.128.187 | (Unknown) |
| 192.168.128.212 | (Unknown) |
| 192.168.128.194 | Rivet Networks |
| 192.168.128.220 | Apple, Inc. |
| 192.168.128.205 | Apple, Inc. |
| 192.168.128.202 | Rivet Networks |
| 192.168.128.207 | (Unknown) |
| 192.168.128.210 | (Unknown) |
| 192.168.128.221 | Apple, Inc. |
| 192.168.128.228 | (Unknown) |
| 192.168.128.233 | (Unknown) |
| 192.168.128.239 | (Unknown) |
| 192.168.128.245 | Apple, Inc. |
| 192.168.128.249 | (Unknown) |
| 192.168.129.23 | Apple, Inc. | 192.168.129.255 | Apple, Inc. | 192.168.129.7 | (Unknown) |
| 192.168.129.12 | (Unknown) |
| 192.168.129.19 | (Unknown) |
| 192.168.129.25 | (Unknown) |
| 192.168.129.26 | Apple, Inc. |
| 192.168.129.30 | (Unknown) |
| 192.168.129.42 | (Unknown) |
| 192.168.129.75 | (Unknown) |
| 192.168.129.57 | (Unknown) |
| 192.168.129.62 | (Unknown) |
| 192.168.129.66 | Apple, Inc. |
| 192.168.129.69 | (Unknown) |
| 192.168.129.71 | Apple, Inc. | 192.168.129.72 | (Unknown) |
| 192.168.129.73 | (Unknown) |
| 192.168.129.80 | (Unknown) |
| 192.168.129.93 | Hon Hai Precision Ind. Co.,Ltd. |
| 192.168.129.95 | Apple, Inc. |
| 192.168.129.97 | iSmart Alarm, Inc. |
| 192.168.129.127 | Apple, Inc. |
| 192.168.129.104 | (Unknown) |
| 192.168.129.108 | (Unknown) |
| 192.168.129.110 | (Unknown) |
| 192.168.129.111 | (Unknown) |
| 192.168.129.137 | (Unknown) |
| 192.168.129.139 | (Unknown) |
| 192.168.129.117 | Apple, Inc. |
| 192.168.129.122 | Liteon Technology Corporation |
| 192.168.129.130 | Apple, Inc. |
| 192.168.129.138 | (Unknown) |
| 192.168.129.152 | Meraki, Inc. |
| 192.168.129.163 | (Unknown) |
| 192.168.129.152 | Meraki, Inc. |
| 192.168.129.163 | (Unknown) |
| 192.168.129.189 | Meraki, Inc. |
| 192.168.129.169 | Axis Communications AB |
| 192.168.129.172 | (Unknown) |
| 192.168.129.174 | (Unknown) |
| 192.168.129.181 | Meraki, Inc. |
| 192.168.129.188 | Axis Communications AB |
| 192.168.129.190 | Apple, Inc. |
| 192.168.129.191 | Meraki, Inc. |
| 192.168.129.201 | Elitegroup Computer System Co.,Ltd. |
| 192.168.129.202 | Axis Communications AB |
| 192.168.129.203 | Axis Communications AB |
| 192.168.129.210 | Apple, Inc. |
| 192.168.129.212 | (Unknown) |
| 192.168.129.216 | AzureWave Technology Inc. |
| 192.168.129.225 | PALLADIUM ENERGY ELETRONICA DA AMAZONIA |
| 192.168.129.251 | (Unknown) |
| 192.168.129.230 | Apple, Inc. |
| 192.168.129.236 | Meraki, Inc |
| 192.168.129.247 | HTC Corporation |
| 192.168.129.254 | Apple, Inc |
| 107 packets received by filter, 0 packets dropped by kernel |
See how many more hosts were discovered!?!
fping discovered 38 hosts on the network whereas arp-scan found 107 hosts on the network.
arp-scan found much more than fping was able to find and also found hosts on 192.168.128.0/24 and 192.168.129.0/24 subnets. This is because of Classless Inter-Domain Routing (CIDR) which you can research on your own but we won't get into anything that technical because it's boring as fuck. This demonstrates why using two tools is much more effective in determining all the hosts on the network and you should be considering running both when on the hunt for hosts on the network. I've had each tool pick up a different amount of targets so run both, depending on situation, and keep the hosts in a file so you're able to target the proper ones should you choose to do so. Try and stay a little organized as well.
So we've now scanned the network and have a whole bunch of targets we can focus on. Fucking great. There's a couple of things we can do to determine what is what. First, the most obvious, is to use the tool nmap to scan each IP we found on the network in order to determine what ports are open and what services/applications are running on those ports. If you don't know what nmap is you're an idiot and should Google that shit right the fuck now. It's to be assumed you know what nmap is. We can also use nmap to discover hosts on the network and to see what ports are open which will help us in developing an attack surface should we choose to go down this road.
Remember to replace my IP examples with your own IP values.
nmap -T 5 -Pn -PR YOUR-IP-ENDING-IN-A-0/24
My Kali attacker machine IP is:
192.168.129.240.
In Kali I open a new Terminal window:
nmap -T 5 -Pn -PR 192.168.129.0/24
-v to see more details when that command is ran.
Running the above nmap command will use ICMP and ARP requests along with scanning the top common ports on the whole subnet. This method will make a lot of noise and depending on how many hosts are on the network will take some time to complete. The "-T 5" basically tells nmap to scan as fast as fuckin possible, like a machine gun, and is very detectable when on a corporate network. Do not run that command when on a corporate network. It's only recommended to include the "-T 5" option when connected to home networks, coffee shops, libraries, etc. where you know there's no IT budget for network defenses. Got it? Who the fuck is monitoring their own personal network that much and analzying all that data?! I'm sure some do but on home Wi-Fi networks and small business networks no they don't, fuck no.
nmap will scan the whole subnet while probing the most common ports while using the -Pn option to treat all hosts as online. Remember, some machines don't reply to ping requests and may appear "offline" but when in fact they're "online". By default nmap will skip any hosts that don't reply to a ICMP echo request and we don't want to miss anything fun like a forgotten webserver displaying home directory contents or something stupid left open, unattended, and insecure. So, ensuring that when -Pn is added nmap assumes the host is alive and scans it accordingly. If you didn't include the -Pn then nmap would send first a ICMP request to a host and since the host didn't reply nmap moves on and you miss out on something good. Doubtful. The point is you want to include -Pn.
But let's be serious it's very doubtful you're going to run nmap and come across some vulnerable application because we assume most devices connected to the networks we're targeting are Windows 10 or 11 or are macOS users with their shit updated. Those users don't have random old ass applications running with open ports and a public Metasploit module available for you to attack it. In this day in age it's doubtful you'll find something of interest but none the less it can be worth a check to see and is good practice.
nmap is also very helpful for when you want to scan the local network for open web application ports such as 80, 8080, 8000, and 443. I use this command sometimes when the router IP is not on the default one as assumed (IE: 192.168.0.1). Since I know the router admin login page is over HTTP/HTTPS I scan the local network looking for open ports that would tell me a web server is running on. For example, the owner of the Wi-Fi network changed the router IP default settings from 192.168.128.1 to 192.168.128.50. If we scan the subnet for open web ports we can determine which IPs are running a web server and connect to them accordingly.
To focus our scans looking strictly for web servers we can tell nmap to scan for specific open ports.
nmap -PR -p 80,8080,8000,443 192.168.129.0/24
Lastly, if you wanted to you could scan all 65535 ports of all the IP's on the network by using the following command (warning this can take a very long time so unless it's absolutely required do not run it):
nmap -PR -p- -T 5 -Pn 192.168.128.0/24
nmap is a very useful tool and should be researched and explored on your own. There are so many syntax variations when it comes to using nmap at different times against different computers which is a topic on it's own. I'm not going into detail with nmap as hopefully most that can follow this course are at least familiar with it. There are plenty of tutorials and YouTube videos on how to use nmap so take the time to tinker around with it and get comfortable with using it.
Once you've leveled up from skiddie hacker fuck face level to intermediate hacker level extravaganza you'll see why nmap should be in your toolbox when it comes to targeting a company/organization.
To recap you've learned in this chapter how to:
- Determine how many people are on the network.
- Determine what type of devices are on the network.
- Begin to profile what you can and cannot attack on the network.